

United States Army Air Force
Arctic: You can beat the Arctic if you...
Get Plenty of rest.
Avoid Tight Clothing.
Eat plenty of fat.
Keep dry and warm.
Fig1: Cover, USAAF Emergencies; Fig2: USAAF Patch Insignia
THE ARCTIC IN SUMMER:
The Arctic is not always ice, snow, and cold. In late August, 80 per cent of
all land north of the Arctic circle is free of snow. Most of the remaining
snow-clad 20 per cent is Greenland. Summer temperatures in the lowlands,
remote from mountains and seacoast, run around 85 to 90 deg. F. From
mid-June to September there are 10 times as many mosquitoes per square mile
over two-thirds of the land north of the tree line than in any equal area in
the tropics.
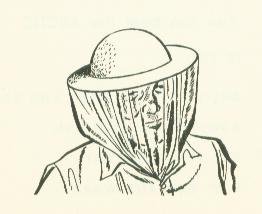
Fig3:
Summer Headnet
THE ARCTIC IN WINTER:
The world's coldest spots are not within the Arctic Circle.
There probably is no spot on any seacoast within the Arctic Zone that can
show a minimum a slow as the -90 deg. F. temperatures recorded at Riverside,
Wyoming. The lowest temperature recorded at Pt. Barrow, Alaska, is -56 deg.
Arctic winter climate on average is dry. Actually relatively little snow
falls. Frequently what appears to be a blizzard is merely old snow being
blown from one point to another by high wind. Annual snowfall added to
annual rainfall seldom exceeds 10 inches. Heaviest snows come in Spring.
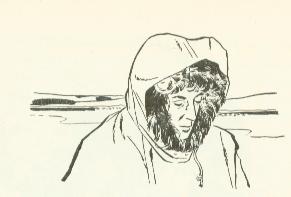
Fig4:
Winter Parka;
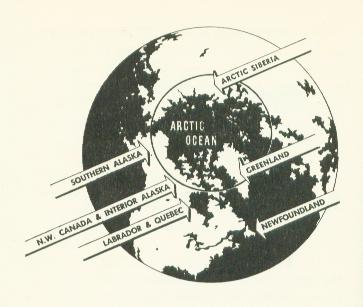
Fig5:
Arctic Circle
LAND YOUR PLANE:
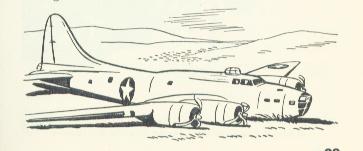
Fig6: B-17 Belly Landing
When an emergency develops over the Arctic, LAND YOUR PLANE if it is
at all possible. Crash landings on snow or ice can be executed with safety.
Landings in snow should be made "wheels up" to avoid nosing over. Make
"wheels down" landing on ice that is free of snow.
Don't wander aimlessly if you are lost. Save enough gasoline for a landing under full control with enough extra for exploratory approach to your landing spot. Watch for blowing snow, it will indicate the direction of the ground wind.
Don't pick an area of ice or snow that looks patchy from a high altitude. It may be deeply drifted snow or rough crevassed ice. Tightly packed snow drifts, known as sastrugi, look like ocean waves from an altitude. If a landing must be made on such terrain, land parallel to the drifts.
In searching for a good landing spot, make use of the natural "sky map." It will save time. In the Arctic, a uniform overcast with clouds at a high level reflects the terrain below it and gives a fairly dependable indication of terrain and general ground conditions. A uniform white "sky" for example, indicates a uniform covering of snow. If the "map" is mottled, the region directly below is likely to be pack ice or drifted snow. Blue (new) ice is indicated by grayish patches, and open water, timber, and snow-free ground show up as black areas in the cloud reflection.
Bail out over the Arctic only in extreme emergency and then stuff your maps, emergency rations, and as much loose equipment as you can in your pockets and inside your flying coat. Landing with your plane is important not only because it will provide you with shelter, food, fuel, and equipment, but because it will serve as a marker for the planes that are sent out in search of you. Men are hard to see on the snow even from a low altitude; a plane stands out against the snow.
IF YOUR LANDING IS IN SNOW COUNTRY, DO TWO
THINGS IMMEDIATELY:
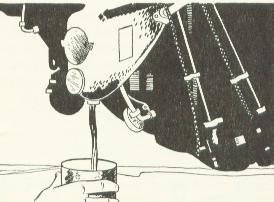
ONE - Drain several gallons of lubricating oil from the engine oil sump In
the far north this oil will be your immediate source of fuel for heating and
cooking. If you wait too long after landing, the oil will become so stiff
that it will be impossible to drain it. A cowl section can be used as a
receptacle. Drain a similar quantity of gasoline, but don't spill any on you
hands if in winter time - it will freeze them.
Fig7: Drain residual oil and gasoline - they will be your main source of fuel if you have been forced down in ice country.
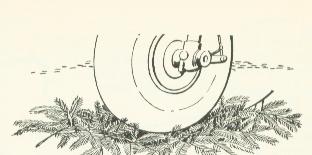
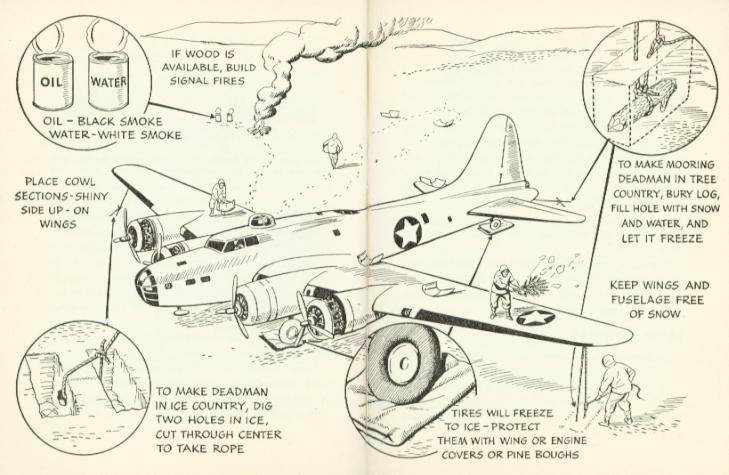
TWO - If conditions allow you to make a wheels-down landing and your plane is still flyable, drain all the lubricating oil ( it will be simpler to heat the congealed oil than to heat the engine if a take-off is attempted) and stake your plane to protect it from the wind. In snow country, mooring anchors can be made by burying branches, sacks, boxes, or cans in the snow and pouring water over the spot. On ice, two holes can be dug a foot apart and a hole chopped through the intervening bridge to take the mooring line. Mooring lines should be tight enough to prevent the plane from rocking. Some measure should also be taken to prevent your landing-wheel tires from freezing to the ice. A padding of boughs, canvas, or straw under the wheels will do the job.
Fig8: If your plane is still flyable after landing, protect the tires with evergreen boughs. They will freeze to the ice if unprotected.
Fig9: Secure your aircraft & prepare signal fires.
SIGNALS:
Remove all snow and frost from your plane - it will stand out better against
the snow. Remove the cowl panels from your engine (or engines) and place
them, unpainted side up, on the wings. They will serve as reflectors. If
wood is available, lay up several large signal fires about fifty feet each
side of the plane. Lubricating oil thrown on a fore will make a smudge that
will be visible for a good many miles. In snow county where there are trees,
distress messages can be written in the snow by forming 200-foot-high
letters with evergreen boughs. Keep your signal pistol or signal flares
where you can get them quickly.
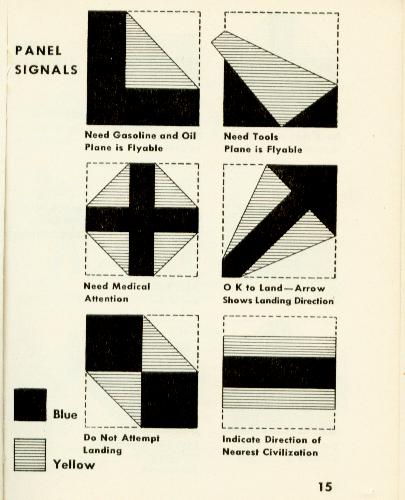
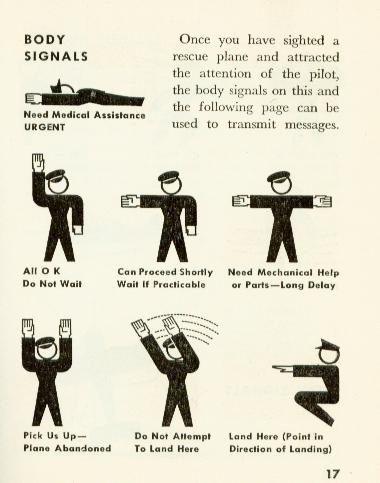
If you are equipped with the basic
parachute pack kit, or life raft kit, make use of the blue-and-yellow signal
panel. For a description of the universal signal panel, mirror panel, and
body signals, see
Fig10: signal panels, Fig11: mirror panel, Fig12: body signals.
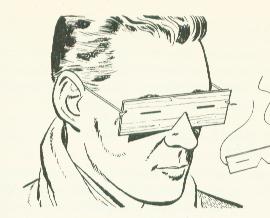
SNOW GOGGLES:
Fig13:
Improvised snow goggles can be made by cutting slits in cardboard or
wood.
As soon as possible after landing check your equipment. Snow goggles should be worn at all times. The snow goggles in your kit will protect your eyes against the glare. If they have been lost or broken, you can fashion a pair of Eskimo-type snow shields from a scrap of wood about six inches long and an inch wide by burning holes or slits through it at eye width. The goggles can be held on with a short length of shroud line cut from your parachute. Don't make your snow goggles out of metal. Metal will freeze to your skin. As an additional precaution against snow blindness, blacken your cheeks and the bridge of your nose with soot, charcoal, or dirty engine oil. The blackening will help cut down reflection.
SNOW BLINDNESS CAN OCCUR DURING A BRIGHT OVERCAST AS QUICKLY AS DURING SUNNY WEATHER.
CLOTHING:
Several layers of light clothing are much warmer than a single layer of
heavy clothing. Inner clothing should be fluffy and porous; outer clothing
should be windproof.
AVOID TIGHT CLOTHING AND TIGHT SHOES:
In winter your cloths should be loose enough to allow a free circulation of
air so that your perspiration can evaporate. If it doesn't, it will form
frost inside your cloths and you will be well on your way to freezing and
frostbite. keep your clothes and your socks dry. If you must do heavy work,
loosen your clothing and remove some of it. Avoid becoming overheated - an
excess of perspiration will mean wet clothing and drying them in sub-zero
weather is difficult. If you get we, change to dry clothing as soon as
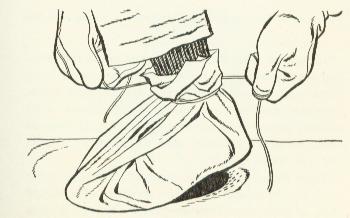
possible. Frost can be removed by turning the garment inside out and beating
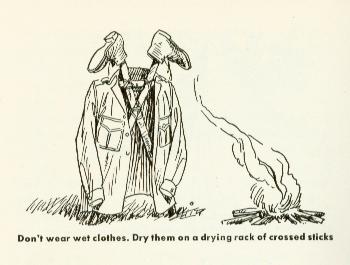
it with a stick. To dry clothes with the heat from a fire build a rack to
hold them.
Fig14: Clothes Drying Rack
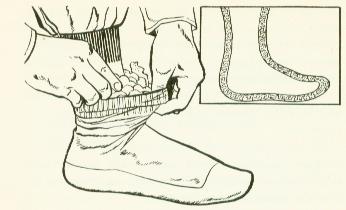
Don't wear tight shoes. If the shoes you have on are not big enough to allow you to wear at least two pairs of heavy socks don't use them. Instead, improvise a pair by wrapping your feet in strips of canvas cut from your wing covers, motor covers, or any other heavy material that may be aboard your plane. If rescue fails, your feet will be your only means of travel, so take care of them.
Fig15: If your shoes are tight, improvise boots from canvas and cord.
Keep your hands and feet warm and dry and you will be fairly comfortable no matter what the temperature. An improvised warm double sock can be made by putting one pair of wool socks inside another and stuffing a layer of stuffing from a preserver cushion in the space between the two.
Fig16: Double socks filled with cushion stuffing will protect your feet.
If you have them, a good combination for keeping your hands warm consists of heavy woolen inner mitts with canvas or other windproof outer mitts. NEVER TOUCH COLD METAL WITH YOUR BARE HANDS. IT WILL FREEZE TO THE SKIN. If you do touch metal by accident, thaw the metal loose from the skin. Don't pull it.
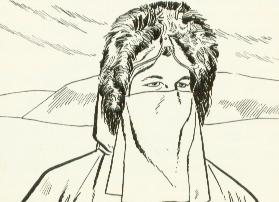
Tight-fitting face masks made of canvas or other cloth should be avoided. They are more of a hazard than a protection. Instead, fasten a piece of cloth across the front of your parka hood just below the level of your eyes and let it hang down loosely below your collar. This type of face shield not only protects your face, but allows your moist breath to escape. DON'T GROW A BEARD if you can help it - moisture from your breath will freeze on your beard and form an ice-mask that may freeze your face.
Fig17: Protect your face with a loose cloth fastened to your parka.
SHELTER:
Shelter can be provided in a number of ways. Hard-packed snow drifts can be
hollowed out to provide protection for two or three men. If a semi-permanent
type of camp is necessary, build an ice house. The ice or snow can be cut
into blocks with a machete or snow knife of metal salvaged from your plane.
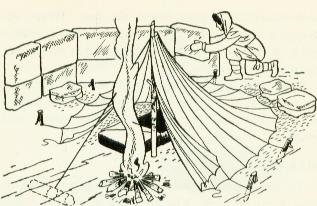
A good tent can be made out of your parachute - with the shrouds serving as stake lines. When you cut your chute free of its harness, save the harness. It can be used as an improvised pack.
Pitch your tent in a sheltered spot, but not in the lee of a snow bank where it stands any chance of being buried by drifting snow. If no natural windbreak is available, construct one out of snow and ice blocks. The opening to your tent should be away from the direction of the prevailing wind and the floor should be covered with boughs, canvas wing covers, engine covers, or seat cushions.
Fig18: Parachute Tent - SAVE YOUR PARACHUTE - the canopy makes up into a good tent.
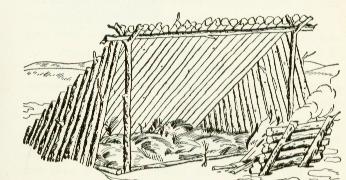
In tree country, lean-to shelter can be constructed by arranging a framework of poles and covering it on three sides with a thick layer of evergreen boughs.
Here again, the floor of your shelter should be lined with boughs, canvas, or seat cushions. If you are using a sleeping bag, air and dry it at least once every three days. Wear as few clothes as possible in your sleeping bag. Excessive body moisture will condense and form frost inside the bag. When this happens, turn the bag inside out and beat it with a stick. A damp or frosted sleeping bag is dangerous, keep it dry.
Fig19: Improvised shelter: In tree country, a lean-to can be made from evergreen boughs.
Don't put your sleeping bag directly on the snow or ice. Protect it with a layer of evergreen boughs if they are available or with a wing cover, seat cushions, or engine covers.
HEAT:
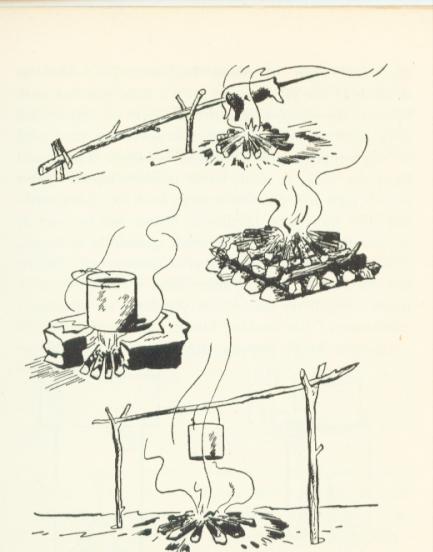
In tree country, wood for heating and cooking fires is no problem. Various
types of fires and fireplaces can be used. Shield your fire from the wind
and in snow country, don't build it directly on the ice or snow. The melting
snow will wet the wood and reduce the heat of your fire. Build it on a crib
of wood or metal as shown on the next page.
Fig20: Build your fire on a platform of logs or metal salvaged from your plane. The platform will prevent the water from melting ice or snow from wetting the fire wood and putting out the fire.
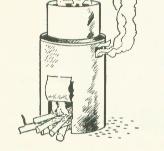
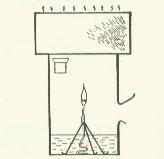
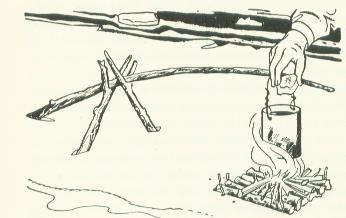
If no wood is available, your main source of fuel will be the oil and gasoline drained from your engine. This can be burned in several ways for cooking and heating. If the oil is congealed, mold it into small balls. Place one of the pieces in the bottom of an open-top can or any other receptacle that has a draft hole cut near the bottom. Cover it with the kapok or other stuffing salvaged from your seat cushions, pour a very small amount of gasoline over top, and light it. More fuel can be added as desired. If the oil is liquid, mix a little gasoline with it, pour the mixture into the can over an improvised wick consisting of four or five strands of twisted cord or rag supported on a bent-wire tripod frame, and light the wick. A small flame inside a closed heater of this type will provide enough heat for quick cooking. The same type of tin-can heater can be used as an economical burner for small quantities of wood.
Fig21: A tin-can stove. A large can makes a good stove, cut stoke-hole and flue.
A heater for use inside your improvised tent or lean-to need be nothing more than a candle burning inside a small tin can. Or, if you have no candles, a miniature of the cooking burner can be made.
Fig22: A tin-can heater that burns oil. wire tripod supports cord wick.
In some Arctic regions surface coal is available as fuel. It can be found in some river valleys. On sea beaches, coal often can be found in the windrows. This coal has been scooped from the sea bottom and piled on the beach by the ice. Starting a fire with this coal may be difficult, particularly if no wood for kindling is available.
Animal fats and hides also provide a source of fuel. A small chunk of caribou suet, for instance, placed on a small piece of wood and lighted, is sufficient to cook enough meat to last three men one day. The hide of a musk ox or a grizzly bear will cook three or four pots of food. Seal blubber also makes an excellent fuel.
WARNING: DANGEROUS CARBON MONOXIDE FUMES ARE PRODUCED WHEN ANY KIND OF FIRE OR HEATER IS BURNED IN AN UNVENTILATED SHELTER. BE SURE TO PROVIDE VENTILATION.
Carbon monoxide poisoning is one of the greatest dangers in the Arctic. Carbon monoxide gas is colorless and odorless, so your only means of combating it is through adequate ventilation, particularly at night. A snow drift may cover your tent and reduce the normal ventilation through the fabric of your tent, so provide some other means of ventilation while your stove or fire is burning. Keep a burner or fire going only long enough to cook your food, then put it out.
FOOD:
Eat as much fat as you can. Fat is a heat-producing food and very important
to your health in the Arctic. In the winter months, animals and fish will be
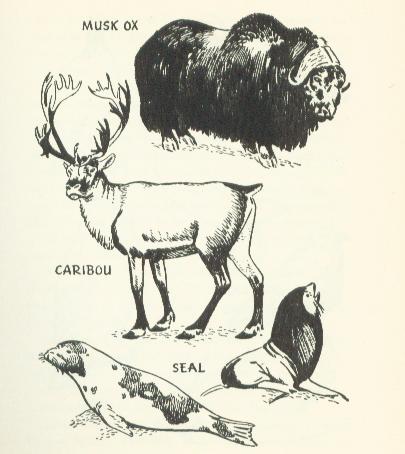
about your only source of natural food. The caribou provides the best meat
of the land animals and the seal provides the best of the sea animals.
Fig23: Arctic Game Animals
The best parts of the caribou for eating are the head, brisket, ribs, backbone, and pelvis. As for seals, there is little preference between the various parts, although most white people prefer the liver, boiled or even frozen and raw. The heart and the kidneys provide good meat for stews. Polar bear is very likely to be tough and stringy if cooked. It is more tender if eaten raw and frozen. AVOID POLAR BEAR LIVERS. THEY ARE POISONOUS. Musk oxen has a strong flavor, but it is rich in fat.
Because of the importance of fats, under no conditions limit yourself to a meat diet of rabbit just because they happen to be plentiful in the region where you are forced down. Rabbits are generally so lean that in order to get enough energy out of them you have to eat a little too much for comfort. Try to supplement your diet with other things.
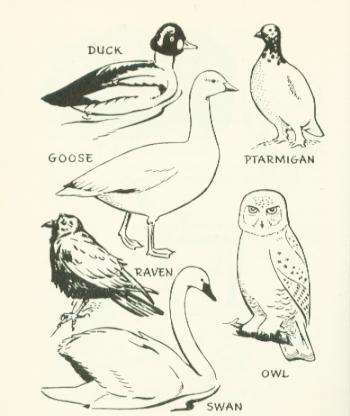
Some Arctic birds are well supplied with fat - notably ducks, geese and swans. These water birds all go through a two or three week flightless period while they are molting in midsummer. The best known winter birds are the ptarmigan, or snow partridge, which is rarely fat; the white owl, which usually is fat and tasty; and the raven, which is tough. Make a point of finding all the gull and tern colonies you can. Here you will be able to get a good supply of eggs and your birds even without a gun. Such colonies are usually on small islands or cliffs.
Fig24: Arctic Birds
On the average, all fish have enough fat to make them good Arctic food. The liver of the cod, for example, is an extremely good form of fat and can be eaten boiled.
Although complete protection from scurvy can be had from a prolonged meat-and-fat diet, the roughage value of greens is important. In an emergency, almost any local green, pleasant to the taste and succulent enough to be swallowed, can be eaten.
There are no poisonous flowering plants or grasses in the Arctic. The only poisonous Arctic fungus is easily recognized by its yellowish red cap. All other Arctic fungi found above the northern timberline are edible.
EDIBLE PLANTS:
There are no known poisonous plants in the Arctic above the timberline.
However, play safe - avoid raw cow parsnip and moss like lichens, they make
you sick. Berries are plentiful and nutritious.
Fig25:
Salmon Berry (Bake Apple):
A low creeping perennial. Edible berries are reddish, turning to yellow as
they ripen. They are juicy, about the size of a large raspberry, and ripen
in July and August. Common in the north to the Arctic Ocean.
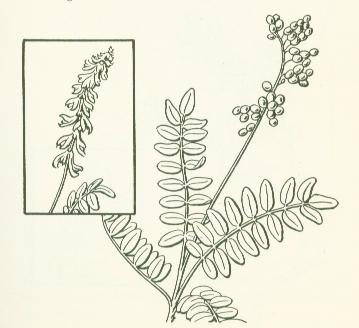
Fig26:
Masu (Licorice-Root):
A non-climbing perennial herb of the pea family. Grows about 1 to 2 feet
high. Pink flowers and flat seed pods. The root is edible and when cooked
has a taste not unlike carrots. It matures in August and can be gathered
until late fall.
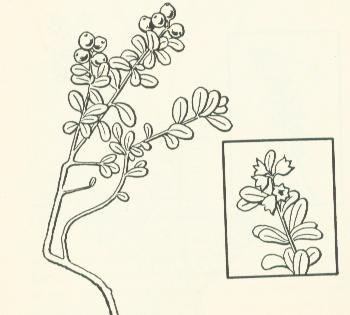
Fig27:
Mountain Cranberry:
A low-creeping shrub with dark green leathery leaves. The dark red edible
berries ripen in August and September and remain on the vines through
winter. Widely distributed throughout northern Canada and found as far north
as the Arctic seacoast.
Fig28:
Blueberry:
A low shrub with many branches. The edible berries, resembling commercial
blueberries, are deep blue, ripening around July and August. The flowers are
greenish around July and August. The flowers are greenish white.
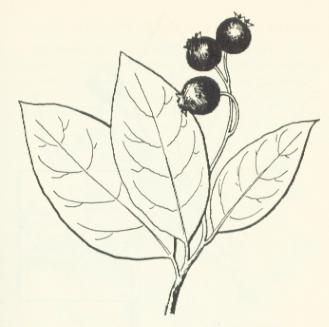
Fig29:
Juneberry:
A low tree or shrub with bronzy-green foliage. The purplish-black berries
ripen in early summer. Found in damp woods and near swamps.
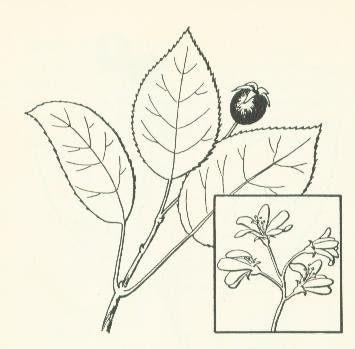
Fig30:
Black Crowberry:
An evergreen shrub, freely branching. The black, shiny berries are juicy and
sweet. Found throughout northern Canada and even on some Arctic islands.
Often they can be gathered from under the snow. The berries keep well when
frozen.
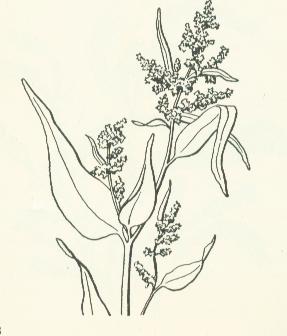
Fig31:
Wild Rhubarb:
A perennial herb 3 to 6 feet high with reddish stem and pointed leaves. Very
common in the Yukon and on the Mackenzie and its tributaries, but does not
occur farther east. The young, juicy stems are edible and when cooked
resemble rhubarb.
Fig32:
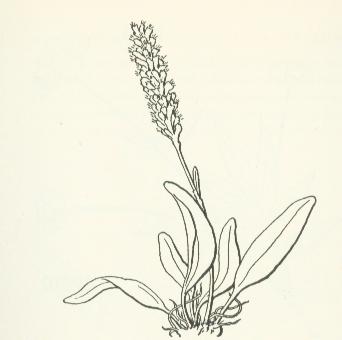
Bistorta:
A low-growing herb 5 to 10 inches high. The flowers are white or pink in the
form of spikes. The root, about the size of a pecan, is edible and best when
cooked. Common in dry country, chiefly north of the tree limit.
Fig33:
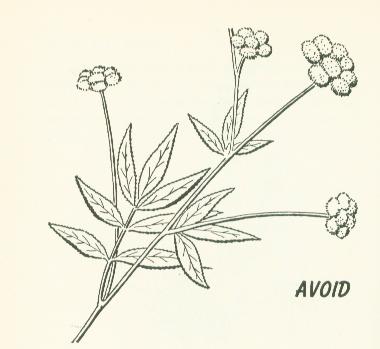
Parsnip: (AVOID)
Parsnip root should be avoided. Although not poisonous, it may make you ill.
Usually has a disagreeable taste. If Peeled, stems and leaf stalks can be
eaten cooked in the spring.
Fig34:
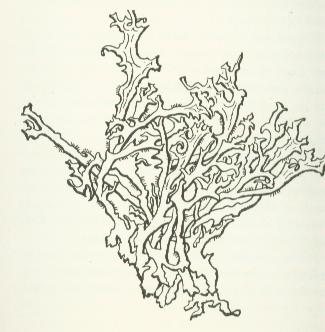
Reindeer Moss:
A low, bushy, coral-like lichen that grows on the ground. Common throughout
northern Canada. This and other similar lichens must be thoroughly boiled or
soaked in water for several hours before being eaten.
COOKING:
In the Arctic, boiling is the easiest and the best method of cooking.
Boiling not only conserves fuel, but preserves the essential elements of the
food. In summer and autumn, fresh water will be available excepting on the
ice cap or on the sea. In the winter, ice or snow can be used.
To cook meat in water from ice or snow, melt small bits until you have an inch or two of water, fill the pot about three-quarters full with the ice or snow, cut the meat into inch chunks and place it on top of the ice, and then put the pot on the fire. As the ice melts, the meat will sink and as the water is gradually warmed the meat will thaw. After the water has boiled for two or three minutes remove the pot from the fire and place it on evergreen boughs or a piece of wood to cool to eating temperature. When the meat has been eaten, the liquid remaining should be drunk. NEVER OVERCOOK MEAT, overcooking destroys the vitamins. For a variation in diet, chunks of meat can be broiled over the fire in any one of a number of ways, but the bulk of your fish and meat should be boiled.
WATER:
AT SEA ice that is a year or more old can be used for drinking or cooking
water. old ice can be distinguished from the current year's ice by its
rounded corners and by its bluish color in contrast to the milky grayish-ness
of salt ice. Ice a year old rarely has only noticeable saltiness, while ice
two or three years old is generally fresher than average river or spring
water. In the summer, fresh water can be found in the hollows in old ice.
Water fresh enough for drinking can be found even in the hollows on new ice,
which itself is salty in midsummer.
ON LAND, drinking and cooking water offers no great problem. In the winter it is perfectly safe to eat snow or cracked ice in small quantities during the day when you are traveling and don't want to take the time necessary to melt it down. Eaten in large quantities, however, it chills the stomach and reduces your body temperature.
When melting down snow or ice, don't fill the pot at once. If you do, the snow on top will soak up the first water like a blotter and leave a cavity directly over the heated bottom of the pot and the pot may burn through. This is particularly so when, as the case probably will be, you are using tin cans for cooking containers. When possible, always melt ice for water, it requires less heat and takes less time.
Fig35: Melt ice instead of snow for drinking water, it takes less heat.
In the summer there are innumerable sources of fresh water. Lakes and streams are seldom more than a mile or so apart in the land north of the Arctic circle.
ARCTIC TRAVEL:
If you were on your flight course when you were forced down, stay with your
plane. Rescue planes will be out looking for you and will find you, but
remember - any search takes time. Don't give up hope of rescue too quickly.
The men who are out looking for you are trained in their jobs and if it is
humanly possible to find you and get you out they will do it. You can help
them by staying with your plane. If they cannot land and bring you out by
airplane, they will drop you necessary equipment and supplies to help you
trek out. Travel in the Arctic is difficult. You will need every aid in the
way of clothing and equipment that can be made available to you.
If rescue fails and you decide to walk your way out, lay your plans carefully and then stick to them. What course you decide to follow should be determined largely by your location and the terrain.
In mountainous or wooded areas, your best course, unless you know exactly where you are and have some definite destination, will be to FOLLOW STREAMS AND RIVERS DOWNSTREAM. They will lead you eventually either to some post of civilization or to the coast where your chances of finding food and a native village will be good. There is just one exception to this rule - in Siberia rivers and streams should be FOLLOWED UPSTREAM. The rivers in Siberia flow north, while civilization is to the south.
DON'T WANDER AIMLESSLY. Use your compass to maintain a general direction, but don't try to travel in a straight line. Follow the contour of the land for the easiest going in the general direction that you want to go. If you have no pocket compass, remove the compass from your plane.
WHEN YOU CAMP, camp on the mountains and not in the valleys. Slopes and ridges in the Arctic are always warmer than the valleys.
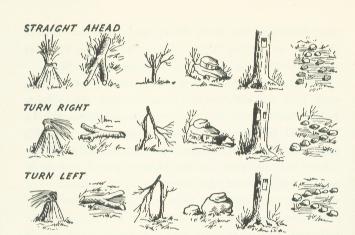
In thick woods, blaze a trail on the trees as you go, just in case you have to double back on your course.
Fig36: Trail Marking - Mark a trail, it will keep you from wandering around in circles.
PLENTY OF FOOD AND REST is the secret of Arctic travel, particularly in the winter. Don't rush, cook at least one hot meal a day, and be sure to get adequate sleep. You can survive many days without food if you will relax and avoid exhaustion, DON'T WORRY ABOUT FREEZING TO DEATH WHILE YOU SLEEP. Unless you are exhausted you will wake up before you freeze.
Before you leave your plane make sure that you are taking everything that will help you make your way back to civilization. Snowshoes, sledges, and shelters can be made out of various parts of the plane. Cabin doors, main landing wheel doors, and bomb-bay doors make good sledges. Skis and snowshoes can be made by removing inspection panels, the cover strips over-root joints, or tail-wheel doors, and lashing them to your feet with thongs or parachute shrouds. A section of engine cowl can be used as a container for melting water for cooking, as a head shelter and windbreak for use with a sleeping bag, or as a fire shield for reflecting the heat of your fire into your lean-to or tent.
In the case of a forced landing made wheels down on an ice floe when no rubber boat is available, an improvised raft can be made by removing the tires from your plane and lashing them together with wire and control cables. The wheels can be removed by stacking ice blocks under the wings so they will support the airplane and permit partial retraction of the landing gear. If there is sufficient time, fuel tanks also can be removed and used as floats. Such improvised rafts will help you to cross open leads and short stretches of sea, PROVIDING THE WATER IS CALM.
BEFORE LEAVING YOUR PLANE BURN ALL PAPERS, TECHNICAL ORDERS, AND TRIP DATA THAT MIGHT BE RESTRICTED, CONFIDENTIAL OR SECRET. SECRET INSTRUMENTS SHOULD BE SMASHED AND THE PARTS BURIED OR THROWN INTO THE SEA.
ARCTIC HEALTH:
FROSTBITE, or local freezing is a constant danger to anyone exposed to the
sub-zero temperatures of an Arctic winter. Strictly speaking, frostbite
cannot be prevented, but the risk can be minimized. To neglect a frostbitten
spot is to invite gangrene.
There is no particular pain with frostbite. Quite to the contrary, there is an absence of sensation, a numbness. Frostbite can occur without a person knowing it, so examine your face, hands, and feet frequently. The symptoms are stiffness and a grayish or whitish color of the part affected.
If you are frostbitten, DON'T APPLY SNOW OR ICE. There is no fact in the old recommended cold treatment. Instead, warm the affected part gradually. Don't rub the spot. Even the gentlest massage can do a great deal of harm. If frostbite appears on your face, warm it by pressing your warm fingers against it. If a wrist is frozen, warm it by grasping it with the other hand. Frozen hands and fingers can be thawed by holding them against your chest or under your armpits inside your cloths.
Frozen feet are particularly serious. try to keep your feet from freezing, but should they get frostbitten, take care of them immediately. Change to a warmer footgear if you can, or wrap them in cloth or fur until they thaw. Warm them, but don't put them close to a heater or a fire. Warm them gradually.
A burning sensation follows the warming and thawing of a frozen part. The actual thawing may be extremely painful. After frostbite there may be blistering and peeling just as in sunburn.
SNOW BLINDNESS is caused by the brilliant reflection or glare from the surface of snow. Avoid it like the plague, for once you have a case, reoccurrences are likely to follow. Wear your goggles, either your flying goggles or your homemade wooden sun shields, at all times during the daylight. Don't be fooled by an overcast day, and on a bright day remember that merely lifting your goggles a half dozen times may bring on snow blindness.
The first warning of snow blindness comes when you can no longer detect variations in the levels of ground. Later, your eye will begin to burn, they will become inflamed and increasingly sensitive. They will pain when exposed even to a weak light.
The best medicine for snow blindness is COMPLETE DARKNESS. During the long periods of daylight this will mean some sort of dark bandage to exclude all light. An ice compress or cold water will bring some relief providing there is no danger of freezing.
In most cases, snow blindness will disappear in two or three days under care. When first used again, the eyes see two of everything, but normal focus soon returns.
CARBON MONOXIDE POISONING. Among the dangers of the Arctic, the danger of suffocation by carbon monoxide is one of the greatest. Particularly for one who has never been subjected to extreme cold for extended periods, the desire to get warm and stay warm often overrules a man's better judgment and common sense. You must depend on your clothing to keep you warm. in temporary shelters, stoves, fires and heaters should be used only for cooking and then put out. A stove burning for a half-hour in a poorly ventilated shelter can produce a dangerous amount of carbon monoxide fumes. carbon monoxide is odorless and can overcome a sleeping person without warning.
The treatment is fresh air. If you are in a shelter and begin to fell drowsy, watch out for carbon monoxide poisoning. Go outdoors, moving slowly; crawl if necessary. Breathe evenly and don't move about. Cover yourself with robes and blankets to prevent freezing. ABOVE ALL, REMOVE THE SOURCE OF THE CARBON MONOXIDE.
GENERAL. When an accident happens in the cold, shock is very likely to take place, especially if there is pain or bleeding. An injured person should be covered immediately with blankets, a tarpaulin, extra cloths, or a sleeping bag. Keep the head and upper parts of the body lower than the legs and lower parts. Administer warm, non-alcoholic drinks and apply heat if possible to the chest, stomach, and thighs.
If it is necessary to use a tourniquet, don't apply pressure to long at a stretch, as freezing may result. Even tight bandages can dangerously reduce blood circulation. If a tourniquet is necessary, keep the part beyond the tourniquet warm, but do not heat it above body temperature.
ARCTIC PESTS:
FROM THE MIDDLE OF JUNE TO ABOUT THE MIDDLE OF SEPTEMBER WHEN THE FIRST OF
THE HEAVY FROSTS COME, the worst arctic pest is the mosquito. During those
months there are ten times as many mosquitoes per square mile over
two-thirds of the land north of the tree line than the average over the same
area in the tropics. Fortunately, Arctic mosquitoes are not disease
carriers, but are bothersome and during the mosquito season head nets,
leggings, and gloves will be important parts of your clothing.
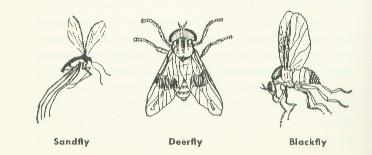
Fig37: Arctic Pests
SAND FLIES, found in large numbers on the mainland, are most bothersome in the early afternoon, decreasing their activity as the evening cools. Known as pinkies, midges, and "no-see-ums," they are persistent blood-suckers small enough to go through the usual netting or head net.
BULLDOGS, sometimes called moose flies, deerflies, or horseflies, look like overgrown house flies. Their bite is like the cut of a scalpel, drawing blood in a trickle. Bulldogs are most annoying on hot days. A head net, leggings, and gloves offer the best protection.
BLACK FLIES are bad pests in certain Arctic areas, particularly in the forests during the summer months. Their bite causes severe swelling. Protection against them is the same as for mosquitoes and Sand flies.
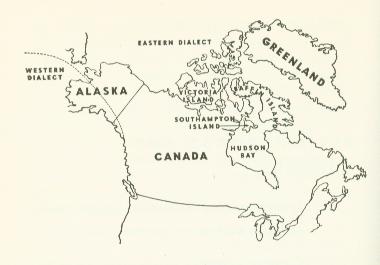
ESKIMO WORDS AND PHRASES:
Syllables spelled like familiar English words are to be pronounced just that way. Syllables printed in heavier type are to be accented.
Fig38: Dialect Map
| English Phrase | WESTERN ESKIMO: | EASTERN ESKIMO: |
| I am hungry Our food is gone Water I am thirsty; I need fresh water Give me a drink of tea! (literally, I need tea) I am cold My boots are wet My clothing is wet Bring a dog sled! Yes No Look! (at my frostbitten wrist, etc.) I don't understand (what has been said) I need food Bring men to help How far is it to the trading post? Matches, or fire Native stove or seal-oil lamp Come quickly Gun To the right! (dog driver's term) To the left! (dog driver's term) Which way Tobacco Where is there a white man |
Kish-tu-ah (the
i long, as
in mice) Neck-out-voot nahng-ock Meck (fresh); Mahk (salt) Meck-soosh-too-ah Shy-oo-mick merry-sing-a Crow-too-ah Comic-sig-kah maht-soong-uk Aht-koo-kah maht-soong-uk Ick-calm-erak ahk-fah-loo-kick Ahng Khang-ah Tahng Ah-yo-koo-chett-oo-a Neck-a-mick pee-yoosh-tu-ah Ahng-oh-tit tide-loo-kay Kite-loon yock-shig-ta kip-oosy-vig-a-moon Spitz-cot; Keen-o-gak Kah-minny-ock; Keen-o-gak Pah-tah-gah-mick tight-ah Noo-tick Jee! Haw! Nah-goon? To-bak-u-mick; Chew-yah-mik Nah-ne Kah-sah tahng-tah |
Kah-poong-ah Ner-key-voot peeto-hung-i-tu-goot Ee-mick (fresh); Ee-mock (salt) Kee-poong-ah; Ee-mick pee-yuma-voong-ah Tee-mick pee-yuma-voong-ah Oo-voong-ah ick-key Kah-mig-ga cow-shook-toot Ah-no-wog-ga cow-shook-toot Comma-tee-nick eye-shook-too Ee-mah; Ah-high; Ah-high-la Nowk; Nah-ga; Ah-guy Tah-koo! Two-key-siggy-lahng-ah Ner-key pee-yuma-voong-ah Ahng-oo-tee-nick ky-ko-see-geet Kah-bloona-tah-lick conn-oak oo-ah-sick-pa? Ee-koo-mock Koo-di-lick Kigh-geet or Kigh-sa-geet Cook-e-oo Owk! or Howk! Owk-a or Ow-ha! Huh-da! Now koot? Tobacco-mik Kah-bloon-ah nowk? |
PRINCIPAL EMERGENCY KITS:
Alaskan Emergency Parachute Kit (Type B-1) - Compass, matches, emergency
rations, gloves, mosquito headnet, cooking kit, iodine, three-bladed knife,
fish line and hooks, camphor gum, insect repellent, and bouillon cubes.
Jungle Emergency Parachute Kit (Type b-2) - Compass, emergency rations, matches, iodine, quinine, signal flare, gloves, mosquito headnet, machete, sharpening stone, fish line and hooks, insect repellent, and first-aid kit.
Emergency Sustenance Kit (Rations) Type E-1 - This kit is intended to supply the necessary rations for operations in northern climates. One kit for every two men. The components include: U. S. Army Mountain Rations, drinking water in cans, matches, hunting knife, mess kit, mosquito headnet, gloves, fork and spoon, mukluks, ice creepers, solid fuel, grill, sewing kit.
Emergency Sustenance Kit (Implements) Type E-2 - This kit is intended to supply the necessary implements for use in northern climates One kit for each large airplane. The components include: Combination .22-caliber and .410-gage shot-gun, ammunition, matches, camphor cubes, flashlight, candles, fry-pan, stew pan, large spoon, butcher knife, cooking oil, machete, fishing kit, and signal flares.
Emergency Sustenance Kit (Type E-5) (Over Water) - This kit intended for carrying in large airplanes operating mainly over water. One kit per large airplane. The components include: Field Ration K, drinking water in cans, flashlight, bailing bucket, compass, matches, knife, hand axe, mirror, candles, fishing kit, flares, paulin, sea markers, and tomato juice. This kit is used in addition to the kit supplied in the life raft.
OTHER KITS ARE IN THE PROCESS OF DEVELOPMENT. ON ALL FLIGHTS WHERE EMERGENCY KITS MIGHT BE OF USE, IT IS ADVISABLE TO CHECK WITH THE SUPPLY OFFICER. DETERMINE BEFOREHAND WHAT IS AVAILABLE FOR THE LOCALE OVER WHICH THE FLIGHT IS TO TAKE PLACE.
Please Read The Website
Disclaimer!
Copyright 1986-2012, The Survival & Self-Reliance Studies Institute (SSRsi), All
Rights Reserved
Site conceptualized, designed, created & maintained by MEG Raven
Snail Mail: SSRsi, PO Box 2572 Dillon, CO. 80435-2572